Monday, November 5, 2012

Make a Bamboo Skewer Shooter

Realized you're going to get in a fight soon, and having nothing to defend yourself with ?
See someone charging at qu, but are unable to slow them down so you can get away ?
Want to practice your aim, but have no projectiles ?
Need answers? Look no farther


STEP

Quick Method

1. Find a long elastic band, one that should fit over your head.


2.  Make an L with your non dominant hand and put the elastic band over it so when you look at it straight; it should look like a gun.


3.  Put the skewer on the opposite end of the elastic, pull it back, taking care it's facing in the exact middle of the space you created, and shoot.


Proper Method

 1. Take a pen, or a mechanical pencil with a body that's just a little wider than a bamboo skewer.


2.  Take out all mechanisms so its a hollow tube.


3. Take a very long elastic band and tie it around one end, but making sure there's still enough of the band left to pull back.


4.  Put the bamboo skewer into the tube.


5.  Pull the elastic band to the skewer, put it on, and pull it back far enough so that the skewer's tip and a little bit of the body are still in the skewer, but most of its sticking out.


 WARNINGS

  • In the quick method, don't shoot your hand.
  • This can hurt somebody a lot, even in the quick method, and can even put somebody's eye out. Use at your own risk.
  • Even though this weapon is strong, it shouldn't be for day to day self protection. Use another weapon, such as a knife or metal rod, or hire a body guard.


TIPS for me

  • In the quick method, keep your fingers as far apart as you can.
  • In the proper method, try to have the tube around a four milimetres bigger than the tube in all directions for best results.
  • Try to find the longest elastic band you can.
  • The tube is to give better aim and a more focused shot.

Sunday, October 7, 2012

Make a Flour Bomb with Household Materials

Making a cheap flour bomb out of things in your house.


Things You'll Need

  • Party poppers
  • Kitchen roll
  • Flour


Steps

  1. Take the explosive parts out of about 4 party poppers and tie them together.
  2. Put some flour on a piece of kitchen roll and place the party popper explosives on the top of it.
  3. Tie some string from the explosives and wrap the explosives and the flour in the kitchen roll making sure that the end of the string stays outside the kitchen roll but the explosives are in the roll.
  4. Seal the kitchen roll so it is in a ball around the flour and explosives.
  5. Light the string and stand back.


Tips

  • You could use more than one piece of kitchen roll and wrap it round the main bomb more than once if you want to throw the bomb.


Warnings

  • These can hurt someone
  • These will leave a mess after impacting.

Saturday, October 6, 2012

Make an Airsoft Grenade

Ever wondered how to make an airsoft grenade? Here are a few different methods to do so.


Steps


Ping-Pong

  1. Get a ping-pong ball


Paper

  1. You can get a piece of paper
  2. Tape it so there is no holes in it but one big one in the top
  3. then throw it above your target.

Easter Egg Method

  1. Open a regular plastic Easter egg.
  2. Drill or cut out the little hole in the bottom.
  3. Insert a firecracker (types may vary), and stick the wick out of the hole (M90's are cheap, small, and very powerful). Be sure to make the wick long enough for someone to be able to get away in time.
  4. Fill the grenade with some inexpensive 6mm plastic BBs.
  5. Close the Easter egg.
  6. Light the fuse carefully.
  7. Throw the egg at the target.

Balloon Method

  1. Obtain some cheap water balloons, and some cheap BBs.
  2. Use a speed loader to load about 50 BBs into the balloon.
  3. Push the BBs down to the bottom of the balloon when you have filled it.
  4. Add another 50 BBs and do the same thing.
  5. Blow the balloon up to the size of a human fist. Add about 10 mm of water.
  6. This balloon will shatter on impact.

Film Canister Grenade

  1. Obtain two film canisters but take away the caps of the canister.
  2. Fill the canisters halfway with 6mm plastic BBs.
  3. Stretch a rubber band around the two canisters.
  4. Slide a piece of cardboard in between the canisters.
  5. Take out the cardboard.
  6. Throw the canisters at the target.

Ping Pong Ball Method

  1. Get a Ping Pong ball and some BB's
  2. Cut a small rectangle about the length of the tip of your finger out of the ball
  3. Fill the ball up with as many BB's as desired
  4. Put a piece of tape over the hole so the BB's do not fall out in your pocket
  5. When ready to throw, take tape off and cover with your finger, throw side-armed over target(s) You can also do this with paper if you can end up making the ball

Shotgun Shell Method

  1. Find a used shotgun shell and fill it about halfway with dirt.
  2. Put a green fuse firecracker in and fill the rest of the shell with dirt.
  3. Put a small hole in a piece of paper and put the fuse though the hole.
  4. Secure the paper with rubber bands.

Origami Method

  1. Get a sheet of paper and make an origami water bomb.
  2. Use a speed loader or funnel and load it to about three fourths capacity with plastic 6mm BBs.
  3. Take a GREEN fused fire cracker and place it in the water bomb's hole fuse side up (or use a bottle rocket with the stick removed).
  4. Place the rocket fuse side up through the water bomb's hole in the top.
  5. Be very careful with it. The explosion CAN set the paper on fire.
  6. (NOTE: Don't use too strong of an explosive, make sure it can't do any serious damage if something goes wrong)

Sandwich Bag Method

  1. Take a plastic sandwich bag, and fill about 1/3 with vinegar
  2. Place 6mm BB's into the vinegar
  3. Take a tissue or paper towel and shake some baking soda (not baking powder) and fold the tissue or paper towel to completely surround the baking soda
  4. Place the baking soda filled tissue or paper towel in the bag do not let the tissue or paper towel touch the vinegar until you are ready to throw the grenade
  5. When you are ready to throw the grenade let the tissue or paper towel to make contact with the vinegar once the vinegar makes contact with the baking soda a gas will be released causing the bag to expand so once it hits a solid object it will blow up
  6. NOTE: The Bag must be firmly closed otherwise the gas will escape from the bag making the grenade useless


Tips

  • The ping pong method works best when you cut the ball in half and tape it loosely together.
  • The fewer BBs in, the more they will shoot.
  • Only attempt under close adult supervision.
  • Always wear safety glasses.
  • Build over a tub as not to lose BBs.
  • use some sandpaper (NOT A POWER SANDER!) to scrape off some of the plastic on the egg with the easter egg method.
  • Use a water bottle instead of a plastic bag on the last version.


Warnings

  • This can be dangerous. Wear protective gear and do not be reckless.
  • Do not throw at moving objects.
  • If used for an airsoft fight, do not throw directly at person, throw at ground 1-2 feet away from target.
  • For methods involving firecrackers,always use green fuse firecrackers. Grey fuse firecrackers will blow up right after you light them.


Friday, October 5, 2012

How to Fly a kite

Flying a kite is great fun on a windy day. It's also very relaxing. The following directions will teach you how to fly a kite with a friend.


Steps 

 1.) Find a buddy to help you get the kite into the air.

2.) You should hold the ball of string called the bridle and have your buddy hold the kite or a light framework. The kite should be facing you and the wind. 

3.) Unwind about 15 to 23 meters (16 to 30 yards) of string.

4.)  Signal to your buddy to release the kite. You should pull on the string to launch your kite into the air. 

5.) Pay attention to the wind direction, here is a diagram:

  • Suppose that "I" is you and "U" is the other person holding the kite
    Wind is blowing this direction: I ------------------------------------> U
  •  "I" stands one end (with the string) ------> "U" stands other end ( with the kite)
  
 6.) Make sure the wind is going in a straight line from you to the other person.
7.) To allow the kite to go higher, release length of string. 
8.) To lower the kite, simply pull in the string.


Warnings

  • Avoid flying a kite on a road or anywhere near an electrical wire pole or trees, as a kite needs lots of space and moves around a lot on its way up and down.
  • Do not fly kites during lightning storms.
  • Do not fly your kite near power lines.


Tips

  • It is best to fly a kite in an open field, such as a soccer field or a grassy field since it is wide and open.
  • The best place to do this is on the beach/standing near a lake. Since out on the ocean there is nothing to block or divert the wind, it would make a better kite flying area.
  • To prevent a kite from crashing:
    • If there is very little wind: run (careful, watch where you are going), remove kite tails and anything that can cause additional drag on the kite and try to make your kite as light as possible. Also, if your kite is going downwards, make the kite's point in the upper direction(by releasing the string slowly) and pull the string as fast as you can.
    • If there is plenty of wind the try the following: tug the line(string) with a pumping motion and let out more line... this works great if you are in a "dive bomb" and can help to recover from that, and if you have already crashed or consider putting a tail or frayed trailing edge or something to create drag on the kite. This will add stability to your kite especially in high wind.


Make a kite easy


All these steps are easy! just follow these steps and you will Be creating a kite in no time!


Steps  

1.) Take a piece of paper and make sure it is square. It can be any color you want!


2.) find 2 sticks and hot glue it to your paper like this+


3.) Find a toilet paper roll that is finished and some string.


4.) attach the string to the toilet paper roll and roll the string onto it and attach the other end of the string to the end of the stick


5.) Fly your kite! it is ready to go!


Tips

  • Make sure that it is a windy day so you can fly it.
  • you can decorate it so it can look pretty and not plain.


Warnings

  • this includes a hot glue gun so if you are a child, ask a parent to help you.
  • be very careful with your kite


Make a Rocket Pen


Things You'll Need

  • A clicking pen
  • Lots of springs
  • Scissors or a nail file.

Steps

  1. Find a click pen, with a top which is metal, or hard plastic, that you can easily unscrew. Make sure that the pen isn't broken or cracked, and has a usable spring, as the pen will not work without one.
  2.  Unscrew the top of the pen, and remove all contents, including any types of removable external parts of the pen.
  3. Once the contents have been removed, begin to shave away the ridges using scissors, or a nail file, where the top is twisted on. Shave the pen enough to pull the top off easily, but DO NOT shave the ridges completely away, as the top will not stay on the pen.
  4. Place at least one spring inside the pen, (where you found it earlier) and completely twist the top back onto the pen.
  5.  if you glue the spring in with a small dab of glue, the spring won't launch off with the pen, thus saving you a lost spring.
  6.  Aiming away from your face, click the now rigged pen, and watch as the top bursts out of the pen at full speed. You have now created a successful rocket pen.


Tips

  • The more springs you obtain, the farther the 'launch'.
  • If you click the pen, and it simply clicks like a regular pen, press on the clicking mechanism hard, until the top flies off. If this fails, continue to shave the ridges of the pen.
  • Since ALL the contents will normally fly out, test your rocket pen in an open space, so you are able to track the contents easily.


Warnings

  • Don't shoot at people, unless out of self-defense. (This includes siblings).
  • Aim only towards a certain target while 'launching' the top; Not at your face.


Thursday, October 4, 2012

Make a Wooden Gun

This is a how to guide on making a wooden gun at home for play purposes.


Things You'll Need

  • Tape
  • Drill
  • Screws


Steps  

1.) Get a piece of wood that is about 60cm either from a shop or if you have a workshop.

2.) Put the wood in a vice. 

3.) Drill a 2cm hole in the wood about 9cm away from one end in the middle of the plank of wood. 

4.) Get some tape and put it around the opposite end of the wood to where you drilled the hole 3cm.

5.) Get a small screw about this size |--------| (not to scale, dependent on your monitor) and screw it in the end were the tape is making sure its on top. 

6.) Sand it or leave it as it is. If your child like playing cowboys or armies, this would be a great birthday present or Christmas present


Make a Sling Shot

are not merely toys. With the right construction and ammunition, this ancient device can also be a lethal weapon suitable for hunting small game in a survival situation. This article provides instructions for making both a handheld and catapult-style slingshot.


Things You'll Need

  • One or two long, thick rubber bands. Alternatively, a length of surgical tubing or some other stretchy, strong material
  • Smaller rubber bands
  • A small piece of leather
  • A Y-shaped branch
  • A knife


Steps


Standard Slingshot


Make a Handle

1.) Find a sturdy, Y-shaped piece of wood. You can make a slingshot with a forked branch of just about any size, but a piece about 6 to 9 inches long with a fairly uniform thickness of 1 to 2 inches will make a strong, easy-to-use slingshot. Try to find a piece with as few imperfections as possible; even moderate cracks can render your slingshot dangerous or unusable. If there are knots or bumps you can cut or sand them off.


2.) Peel off the bark. With the bark gone the slingshot will be more comfortable to hold. You may need to let the branch dry a little before you can get the bark off.


3.) Let the wood dry. This step isn't necessary, but if the wood is still green, it's a good idea to let it slowly dry. This will give it more stability and strength.


Make a Sling

1.) Get a long, thick rubber band to form the firing mechanism. You can make a stronger firing mechanism by using surgical tubing or several rubber bands wound around each other. You can experiment with the length to find out what works best, but it is important that it be strong and thick.


 2.) Cut the rubber band in half. You now have a band for each side of the slingshot. If you're using surgical tubing or multiple rubber bands, you can skip this step; just make sure that each band (for either side of the firing mechanism) is of equal length.


3.) Get a rectangular piece of leather or strong cloth. (Several rectangles of duct tape stuck together work, too.) This will be your holder or "pocket." It should be slightly rectangular, with each side measuring between 2 to 4 inches.


 4.) Cut a slit on either side of the pocket. Use a knife to make an incision about 1/4 to 1/2 inch in from each edge. The slits should run parallel to the shorter edges of the pocket and be the same distance from their respective edges. The slits should also be just large enough for the rubber band to fit through without being wrinkled.


5.) Slip one end of one of your rubber bands through the slit and fold it back over itself so that it makes a little loop around the edge of the pocket. Secure the loop by putting a small, but sturdy rubber band around. The smaller rubber band will probably have to be doubled or tripled around itself to make it tight enough. Repeat this other rubber band on the other side of the pocket. Make sure the bands on both sides are still of equal length.


Assemble for Use

1.) Secure the free ends of the long rubber bands to the handle by tying them or using electrical tape. Attach one free end to either branch of the “Y,” near the tip. Once again make sure the bands are of equal length.


2.) Shoot your slingshot. Use small rocks, rubber balls, and wadded-up pieces of paper--just about any small projectile--as ammunition. Exercise caution when firing your slingshot and wear eye protection.


Tips

  • Surgical tubing works better than rubber bands. It is much stronger due to its shape, and can be bought online or even at some hobby or hardware stores.
  • Tightly wrap the handle with tape or twine to provide a surer, more comfortable grip.
  • You can make slingshots of just about any size. Try varying sizes to find out which work best.
  • Dried wood works better for slingshots. Make sure it's dried slowly or it may be prone to cracking.
  • To protect your eyes, don't raise the slingshot to eye level. With practice you can be just as accurate (or more) by holding the loaded pocket in a fixed position close to your body (near the hip for example), and moving the body of the slingshot to aim.
  • Head bands can be used in the place of rubber bands as they don't break as easily and are longer.


Warnings

  • Use your slingshot responsibly. Treat it with the respect it deserves.
  • Your rubber bands should be as strong as possible. Therefore, be sure that they aren't dried-out, cracked, or torn.
  • Never fire your slingshot in the direction of people or animals. Your slingshot should be treated with the same caution as a deadly weapon.
  • Protect your eyes and use your slingshot with care.
  • Be sure that the branch has no sign of rot; a dead branch can result in serious injury.
  • Never pull the pouch back to your eye. If the rubber snaps, you will hit yourself in the face.
  • Always be aware of your surroundings.
  • If you have a wooden frame, first make sure that it is a solid piece of wood that doesn't have cracks or holes.


Tuesday, October 2, 2012

Make a mini Volcano

Few kids can resist the allure of making a volcano in their own home... even if it is made out of simple things like clay and soda. Making a volcano is an ideal science experiment, homeschool or school project or just something to get the kids to do on a rainy day. And even the adults can have some fun making these, if you include the activity as a party game. This article presents various different ways to make a volcano––choose the one that seems the most interesting to you.

Things You’ll Need

(Items needed depend on method chosen; for more details see steps within each method.)
  • Play-dough or flour, salt, water and cooking oil for making your own dough
  • Pie tin or plastic container
  • Suitably sized plastic bottle or soda can or container
  • Red, orange, pink, brown, or green food coloring
  • Liquid dish soap
  • Baking soda
  • Vinegar
  • Funnel
  • Dirt
  • Wax paper


Steps


Clay and bottle volcano

1.) Form the bottom of the volcano. Purchase clay, or make your own salt dough/play dough or clay.


 2.) Get a clean 15 ounce soda or water bottle, and place it in the center of the base.


 3.) Build the clay up around the bottle, making sure to press the clay firmly around the base of it. Take care not to get any other materials around or inside the mouth of the bottle.


4.) In a small sink, add baking soda to the bottle using a funnel. Adding both together in a bowl will produce bubbles in a bowl, not a volcano.


5.) Place the funnel in the mouth of the bottle and pour in the vinegar, then stand back! Alternatively, if you want another way to make it erupt, put Pepsi or diet coke in the bottle then drop either two or three Mentos.


Clay and soda can volcano

1.) Lay down a sheet of wax paper.


 2.) Put a soda can on the center of the volcano. If you have a large base, you can use a larger can.


3.) Mold the clay from the base to the top of the can. Remove the can.


 4.) Leave for one hour or until dry.


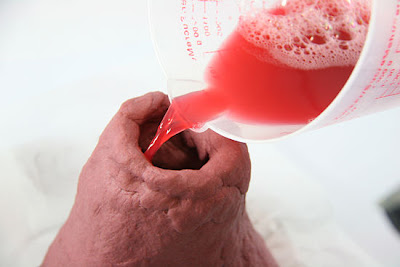
5.) Color some vinegar with red food coloring.


 6.) Pour it into the volcano.


7.) Take baking powder and pour it on a square of toilet paper or paper towel.


8.) Fold up the toilet paper/paper towel. Keep it closed with rubber bands.


9.) Drop the baking soda roll in the vinegar.


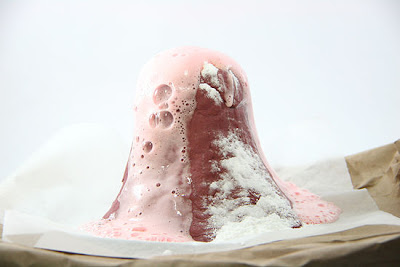
10.) Step away. Once the paper dissolves, your volcano will explode.


Warnings

  • This is an extremely messy experiment! It's best performed outdoors or in a kitchen or bathroom with tile floors. If using food coloring, there is a risk of staining floors and furnishings.
  • Stand back as soon as you pour in the vinegar––the volcano will immediately start to erupt.
  • This experiment can be dangerous if you are too close. The fizzing ingredients can end up in your eyes if you're too close to the volcano when it erupts. Step back 2 feet (60cm, 2 ruler lengths) immediately.