Sunday, September 30, 2012

make Bolas

Have you ever read "Mattimeo" and wanted to have bolas just like Slagar the Cruel and attack your enemies? Well this guide shows you how to make it from household items! Read on!


Things You'll Need

  • Three medium-sized strings.
  • Three stones
  • Paper
  • Paper towels
  • Scissors
  • Tape
  • An enemy


Steps

 1.) Gather the materials from "Things You'll Need" with the exception of an enemy.


 2.) Cut the towel into three even squares, preferably 3 by 3 inches.


 3.) Place a stone in the middle of each of the squares.


 4.) Tape a string to each of the stones.


5.) Wrap the towel square around the stone and tape it shut, with the string coming out on one side.


6.) Gather the three stones/string/paper and put them aside.


 7.) Cut the paper into a rectangle that's about 10 by 6 inches or as long as you want.


8.) Take the paper and make sure that the long side is on the bottom (length).


9.) Tape the strings of each of the stones about a few inches from each other.


10.) Wrap the paper into a cylinder and tape it shut. You may want to tape the ends shut.


 11.) Test it on an enemy and hope (s)he doesn't die.


 12.) If it works, you may want to make more (these are cheap, disposable ones and outcome may depend on the quality of the materials).


Tips

  • Most professional bolas are made from special bola-ish items. If you're that crazy about bolas, try buying one instead of making your own. They might work better.
  • Try to find light and medium-sized stones that won't snap the strings when you swing them.


Warnings

  • As with all weapons, use with caution-they might seriously hurt/break someone/something.
  • If you are in a wilderness survival situation, this is a fast and easy weapon to make, but spend your energy on finding food, and shelter, if you have had no prior training with these, they require more skill than one might think.


How to Make a Zoetrope

A zoetrope works similar to a flip book: if you move many images through a single spot fast enough, it creates the illusion of a single, animated image. Unlike a flip book, though, in which you flip through the pages quickly, a zoetrope rotates the images, which are viewed through a slit. These instructions will show you how to make your own little zoetrope animation.


Things You'll Need

  • A circular paper box, such as a cheese package (With a top and bottom piece)
  • Stiff black paper or card
  • White paper (copy paper)
  • Marble
  • Wide masking tape
  • Marking pen
  • Pair of scissors
  • Retractable knife or craft knife


 Steps


1.) Start with a circular box or lid. This circular box and its lid could make two zoetropes, or you could make a thaumatrope with the other piece.


2.) Cut a piece of adhesive tape 3-4cm square (about 1.5-2 inches).

    Cut a piece of adhesive tape 3-4cm square (about 1)


3.) Make a hole in the bottom of the box. The size of the hole should be should be a lot bigger than the diameter of your marble. Make sure the hole is centered on the bottom of the box.

  
      Make a hole in the bottom of the box.


4.) Stick the tape on the outside, over the hole, and cut radially from the inside.


      Stick the tape on the outside, over the hole, and cut radially from the inside.


5.) Glue a glass bead from the inside so that it extends beyond the bottom rim of the box. Remove the tape from the bottom surface of the glass bead, as shown. There are various methods, but the idea is to make the box spin like a top.


  Glue a glass bead from the inside so that it extends beyond the bottom rim of the box.


6.) Draw a picture on a paper strip, as you would for a flip book. The paper strip should be the same length as the circumference of the circle (i.e. enough to go around without any gaps or overlapping). Remember, the box will be spinning, so you might want to make the pictures go in a loop (so that the last one is also similar to the first).
 
 
     Draw a picture on a paper strip, as you would for a flip book.


7.) Cut slits in a black paper strip, as shown. Make them the same distance apart as the pictures. Make the black paper strip smaller than the container.


     Cut slits in a black paper strip, as shown.


 8.) Place the black paper strip around the outside edge of the box.


    Place the black paper strip around the outside edge of the box.


 9.) Set the illustrated paper strip on the inside of it, with the illustrations between the slits.


10.) To view your animation, look through the slits in the black paper to the pictures on the opposite side, and spin the box on the marble, like a top.


Tips

  • If you want, decorate or cover the outside of the box or lid to cover up the name of whatever product came in it. Try a wavy or spiral pattern that will also look interesting when the box spins.
  • You can make many animations for one zoetrope. Just make a new paper strip and draw new pictures. Use the same spacing for the pictures as you used for the slits.
  • You can use a tiny bit of tape to hold the animation strips in place, but try not to unbalance the assembly.
  • The standard of the package depends on an area, so please customize the size.
  • If you don't have a marble to hand, a round topped pin pierced through the base of the lid makes a great alternative.


How to make simple Grenade Launcher

Alright, what you are about to make isn't a real grenade launcher. It doesn't shoot grenades, but the ammo used here is much like the Brute Shot in Halo.


Things You'll Need

  • 2 identical tubes, large enough to put a Poland Spring bottle inside them.
  • Poland Spring bottles.
  • Tissue Boxes.
  • Electrical tape, or other strong tape such as duct tape.
  • Strong scissors.


STEPS

The Ammo

1.) Take your Poland Spring bottle (T is the top, B is the bottom, and W is the wrapping)

2.)  Twist the bottle under the wrapping so that it is very tight. Then take your tape and tape it very tightly in such a way that when you release the bottle it doesn't undo it. There you have your first piece of ammo. the more you make, the better, because you can launch them without the gun.


 The Gun

1.) Take one of your tubes and cut it from end to end. Cut the tube again leaving 1/2 inch from the first line. 

2.) Cut it down the middle.

3.) Again: Space between cuts are 1/2 inch away.

4.)  Fold over it and tape well.

5.)  Tape off one end of the tube so that nothing can penetrate it.

6.)  Cut out a rectangle at the end of your second tube. #This cut on top of the tube should be big enough for the ammo to be dropped in.

7.)  Cut out another rectangle on the other end of the tube and below  (Make sure you leave one side of the rectangle you're about to cut alone).


You are trying to make a flap, not a hole. Or diagonal from the first rectangular cut.

 1. Insert your tube with the taped end into the first tube with the rectangular hole. Take another Poland Spring bottle, and cut it into a funnel, cut the bottom off, and cut the cap part off, for it to looks like a pyramid with a hole on top. Make sure you are able to insert another bottle into the funnel you have made. Make sure the bottle's cap is sticking out of the funnel.

2.  tape your funnel securely to the tube. Make sure it is on the end with the rectangular hole, on the bottom.

3.  Cut the top of the box and bottom (the largest sides.) of your tissue boxes. # Tape the boxes so they are stacked up high. Leave the highest box's bottom uncut. You just made a magazine for your "grenades."

4.  Tape the magazine tightly to the tube.

5.  Cut the top of the tissue box so that you can open the top like a flap.| You should be able to insert the bottle in the flap on top of the tissue box.

6.  With your magazine loaded, pull the tube with the tapped off end out, and let a bottle fall in the cylinder. Push the bottle forward with the tube into the funnel. Fire the cap as seen above in "HOW TO LAUNCH THEM." Open the flap on the bottom of the tube and let the shell fall out. Close the flap, and pull the tube with the tapped off end, back, so that another bottle falls in place. Repeat and enjoy.


Launching it

1.) Without gun: Hold the bottle firmly and slowly twist the cap until you hear a small hiss. As SOON as you hear it, twist the cap as fast as possible. Make sure you don't have a tight grip on the cap or you will have to slow it down.

2.) You should hear a loud pop and water vapor should be visible giving a smoky effect and the cap can fly anywhere from 20 to 100 ft,

3.)  With Gun: When you have the ammo in the funnel, hold it below the cap with one hand and hold the cap with the other. Doing the same method as seen above, hold the tubing under your arm.


Warnings

  • Don't shoot at people's eyes.
  • Never shoot animals. While humans know it is only a game, they feel actually like they are in danger. Plus someone could perceive this as you are trying to kill the animal and call law enforcement!
  • This does not work against the newest razor wire. This is steel with special component so it resists regular explosions.


Make a Portable Soda Grenade

Many grenades and other explosives require lighting a fuse in order to for them to detonate. However, this type of grenade does not need to be lit in order for it work, making it portable and available whenever it is needed.


Things You'll Need

  • One kinder surprise plastic egg
  • Baking soda
  • Cling film
  • Vinegar
  • Cellotape
  • String (15cm)
  • Pin


Steps  

1. Make a hole on the top of the kinder plastic egg with the pin. Most of the eggs already have a hole.

 2. Fill the bottom half of the egg 3/4 of the way full with vinegar. Be careful not to spill any. Cover the open end of the bottom half with cling film, leaving some slack in the centre. Now the vinegar should be sealed.

3. Gather the cling film slack in the centre and tie it with the string. When the grenade is complete, pulling the string should break the cling film and allow the soda and vinegar to mix. 

4. Feed the top half of the string through the hole in the top of the egg.

5.  Heap 2 tbsp of baking soda on the cling film, then close the egg.

6. Cellotape the closed seam shut. 

7. Now you will have a sealed egg with some string sticking out of the top. Stick a strip of tape at the base of the string 'pin'. This will stop the gas leaking out of the hole when the soda and vinegar combine.

8. When ready to use, jerk the string 'pin' to break the seal, give the grenade a quick shake and throw. If constructed properly, the grenade should not break into shrapnel, but split along the seam and violently spray the inside mixture outwards. 
9. Enjoy your grenade! If you are a budding soldier, carry around at least two grenades with you BB gun when going on patrol or playing.


Tips

  • Do not seal the seam shut with too much cellotape. This will prevent the grenade from exploding properly and will either rupture or shrapnelise the grenade, so you can't use it again. One layer of cellotape should be enough.
  • The cling film may look a bit thin, but adding more than one layer will prevent the string 'pin' from wroking properly and it will not allow the components to mix properly.
  • Make sure you tie the string to the slack securely, otherwise when you pull the string 'pin' the string will just slip off the slack and will result in a dud grenade


Warnings

  • Do not use indoors or near any living things.
  • Do not throw the grenade onto a hard surface like tarmac or concrete as this will crack the grenade and release all the gas.
  • When shaking the grenade, shake it for 1 second otherwise the grenade will explode in you hands. This can be very uncomfortable.


Saturday, September 29, 2012

How to Make a Paper Town

this make simple town from a Paper : 


You'll Need

1. Paper
2. Scissors
3. Tape


STEP

1. Cut 1 piece of paper in fourths.
    The 1st cut through the exact middle, the 2nd cut can be off a little bit.


2. Draw 3 lines evenly across the paper lengthwise across the paper.


3. Fold the paper along the lines.


 4. Tape the sides together.


5. Tape two buildings together on top of each other to make a skyscraper.


6. Put a building sideways to make a cave or tunnel.


7. Cut a hole in the side almost the size of the end of the tunnel to connect buildings and tunnels.


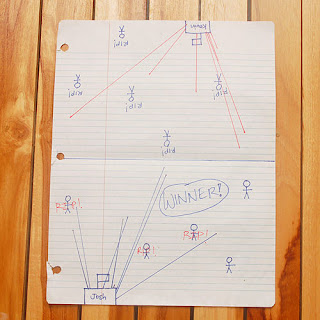
Play the Paper Game War

The popular paper game known as War where all you need is paper, a pen, and a friend (or enemy)!


Things You'll Need

  • Notebook Paper
  • One pen per player (optional: different colors)
  • Someone to play with


 Steps

1.) Take a piece of regular notebook paper and fold it in half hamburger. 


2.) Unfold it and draw a line over the crease.
3.) Each player draw a fort on their side of the paper (a half box on the edge of the paper with a flag).
4.) Each player draw five soldiers on their side (stick figures are only allowed if both players use them).
5.) The object of the game is to take out the opponent by "shooting" his players and fort.


6.) During your turn, draw a straight line no longer then 3 inches on your side of the field that you think will touch your opponent's soldiers or fort when the paper is folded over.


7.) Once you have your bullet drawn, fold the paper over.

  • If it touches an opponent's soldier (head or body; NOT legs or arms), that soldier is destroyed.
  • If it hits the opponent's fort draw an X or a dot to show that you hit it. After 5 hits the fort is destroyed.
 8.) The opponent then takes his turn.


9.)  A person wins when all of the other player's soldiers and fort is destroyed.


10.)  Learn the rules:


make a paper Beretta/Pistol/Gun

There has been a lot of commotion as to how to make a paper gun. While this may not turn out as to your liking, this should give you a basis in how to make your own gun. This way you can modify it to your liking. That being said, let's begin shall we?


Things You'll Need

  • About 7 pieces of paper
  • 1 index card
  • Scissors
  • Tape
  • ruler
  • stapler


Steps

1.) Get an 8.5 x 11 computer paper (looseleaf paper works fine) and roll that paper so that the diameter is very close to 1 cm. Tape both ends as well as the middle.


2.) Fold each paper lengthwise 3 times.


 3.) Take first sheet and fold the paper crosswise. This will be the barrel.


4.) Get the second sheet of paper and fold both ends downwards, forming a 90 degree angle. This will be either the handle or magazine of the gun.


5.) Fold it in the center. This should be aligned so that it fits in your hand.


 6.) Hold the handle of the in one hand.


 7.) Slide ii in the barrel Do not slide it in all the way, leave about 1 cm sticking out.


8.) Tape or staple the sides. Looking like a gun now, right?


9.) Add some details using a marker.


10.) Now cock it!